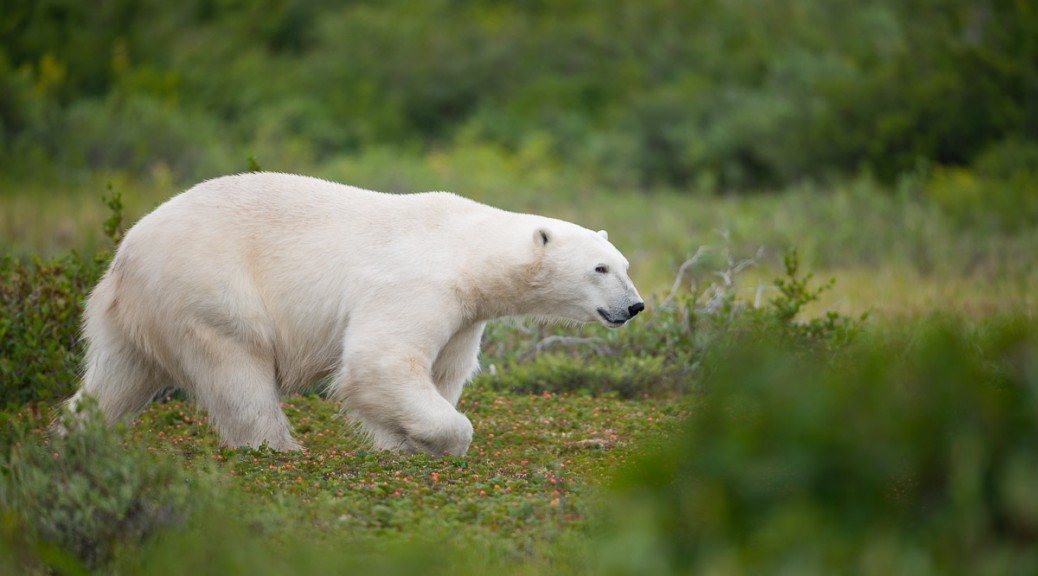
This past summer I had an amazing opportunity to visit northern Manitoba. I’ve posted a gallery of polar bear photos from the trip.
Category Archives: Uncategorized
Photos from Belize
I’ve organized my photos from the Belize trip and selected some of my favorites. Click here to go through a series of images from the trip, including captions describing each image.
Travel reading

This isn’t directly photography-related, but I’ve recently been taking the Kindle e-book reader with me when I travel. It’s a good alternative to bringing the half dozen books I might otherwise carry. Those weight savings are especially nice when I’m already loaded down with photo gear. Anyways, this was just a fun shot I setup while reading by the pool…feels very 2009 to me.
Canon 24mm f/1.4L lens quick review
I’m currently renting a Canon 24mm f/1.4L lens. This is the first time I’ve used one, so I thought I would share my impressions. Short answer…I love it!

|
| ISO 800, 1/50 sec at f/1.4 |
24mm is probably my favorite focal length, and the super-shallow depth of field from the large aperture is just great. So far I find that the bokeh is very pleasing too. Attached to the 5D Mark II the combo is just about small enough to look like a “normal” SLR and be reasonably discreet. That’s why I felt comfortable bringing it out to dinner, where I took the above shot…not something I’d really want to do with a 1-series body and 24-70mm lens.

The lens is surprisingly sharp in the center, even wide open at f/1.4. It’s not tack sharp, but on a lens like this I don’t mind, since I’m looking for a slightly dreamy feel anyways. I’d imagine that the corners are quite soft at that aperture, but I can’t imagine that mattering for how I would use this lens. The newly released Mark II version of this lens is supposed to feature improved sharpness.
Any negatives? Autofocus seems to be a little slow. However, I’m still getting a handle on the low-light AF performance of my 5D Mark II, so I’m not certain I can blame the lens just yet. It would be nice to have the weather sealing that was added to the Mark II version. On the other hand, the Mark II is slightly larger.
All in all, I’m very impressed. It’s everything I hoped for. I’m very tempted to pick up a used copy as people upgrade to the Mark II version. I have a few ideas for nature images that I want to attempt with this lens…
Note: For more samples, see the “photo of the day” from yesterday and today…they were also shot with this lens at f/1.4.
Adobe released Lightroom 2.2
Hooray! Lightroom 2.2 is released. Now my 5D Mark II workflow will be simplified. I’m downloading as we speak.
Why you should use the AF-ON button

By default, most SLRs autofocus when you half-press the shutter button. If you want to recompose before taking the picture, you have to keep the button held down while you recompose. This can be awkward, which is why many photographers choose to do things differently by remapping autofocus to a separate, dedicated button. I first learned about this technique when I was shooting sports and have since taken it for granted. With the release of the 5D Mark II and it’s new AF-ON button, I thought some people might be wondering what it’s all about.
To get the benefits of the AF-ON button, you need to change Custom Function IV-1 to 2, which will disable the default autofocus behavior of the shutter button. Now the camera will only autofocus when you press the AF-ON button. Once you release the button, the focus will stay where you left it and you’re free to recompose at will. If the camera-to-subject distance isn’t changing, you might take many photos before refocusing again.
One of the things I really like about this setup is that I don’t need to worry about turning autofocus off when I’m composing a landscape image on a tripod. I usually focus such images manually so as to maximize depth of field. Since most of the lenses that I use feature full-time manual focusing, I don’t even need to move the switch on the lens out of the AF position.
Finally, if you want to track a moving subject, just set your AF mode to AI SERVO. Now you can hold down the AF-ON button to track your subject. In fact, I leave my camera set to AI SERVO all the time. For static subjects I just press the AF-ON briefly until I get a focus lock. Technically ONE SHOT is supposed to be more accurate for static subjects, but I haven’t had any problems. Besides, if I want critical focus on a static subject I’m more likely to check focus by eye or with live view.
If your camera doesn’t have a dedicated AF-ON button, most Canon SLRs allow you to set a custom function that moves AF activation to the * (exposure lock) button. Other manufacturers usually include similar functionality.
Update: One more thing. Maybe it goes without saying, but this technique works best if you’re using a single AF point.
Lightroom 2.2 release date
Adobe’s website is now listing December 16 as the expected release date for Lightroom 2.2. This version will include support for the Canon 5D Mark II and other new cameras. I’m looking forward to being able to import my 5D Mark II images directly into Lightroom, so I hope the date is accurate.
Update: Hmm, it’s already been removed from that page. Guess they jumped the gun by posting before the download was there. I should have taken a screenshot.
In the interim, I’ve had good results using version of 5.2 of Adobe’s free DNG converter to process my 5D2 RAW images. After conversion, I can import the DNG files into Lightroom 2.1.
Temporary Camera
I’m still (im)patiently waiting for the new Canon 5D Mark II, but in the meantime I’ve been lucky enough to borrow an original 5D from a friend. So at least I’m no longer camera-less, and I can start shooting again. Hopefully this means that my Photo of the Day will be back to a more regular schedule as I start making new images again.
Lack of Updates
Readers may have noticed that I haven’t updated the Photo of the Day in over a month. That’s because, as you may have gathered from my previous post about switching to the 5D Mark II, I’m currently camera-less. Hopefully I’ll have my new camera within the next few weeks, at which point I’ll start posting photos again. Maybe I’ll even be able to catch the last of the fall color.
Corvallis Fall Festival
I’m going to be selling prints at the Corvallis Fall Festival in two weeks. I’ll be pretty busy getting all of my prints ready, so I probably won’t be posting as many new images until then. But for the next few days I still have some more things to show you from last weekend’s backpacking trip.