Category Archives: 5D Mark II

Firmware update fixes 5D Mark II black dots problem

Good news! Canon just released a firmware update for the 5D Mark II, and it looks like the black dots problem is fixed. Before installing the new firmware, I setup my camera and a test subject and took a series of images. Then I installed the new 1.0.7 firmware without moving the camera and reshot the same images. You can see the comparisons below.

(The swatches are bigger than in the original test from a few weeks ago, because apparently I had my camera closer to the subject this time. I didn’t notice until afterwards, and there’s no way to rollback the firmware and reshoot.)

Original (1.0.6) firmware New (1.0.7) firmware
ISO 100
ISO 200
ISO 400
ISO 800
ISO 1600
ISO 3200
ISO 6400
ISO 12800
ISO 25600

So it looks like everything is okay. Hopefully people who photograph city lights and other problematic subjects will confirm my findings with real-world images.

Update: Just a word of caution…I normally wait a little while before installing new software, just in case the update actually introduces new problems. This time I rushed in so that I could serve as a guinea pig. Things seem to be fine so far, but if you aren’t bedeviled by black dots you might want to wait a week or two and see what happens.

Canon 5D Mark II high ISO noise test

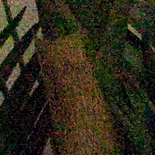
Okay, it’s time for a bit of pixel peeping. There are already a bunch of articles out there about how the 5D Mark II performs at high ISOs, but what I’m particularly interested in here is the tradeoff between resolution and noise. I don’t have the Nikon D700 or D3 to compare to, but what do the 5D Mark II images look like if you scale them down to 12.1 megapixels? When you scale the image, you’re going to affect the signal to noise ratio and potentially make the noise less visible.


So what I’ve done here is capture the image at various combinations of ISO and file size. Then I applied a variety of noise reduction and resizing settings to see what sort of trade-offs there are between noise and resolution. I think it’s been established that this camera produces great images at lower ISOs, so for this test life starts at 1600.


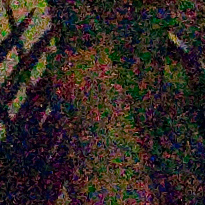
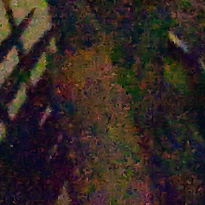
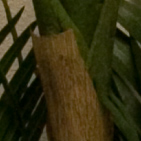
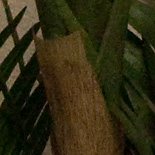
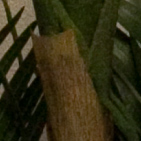
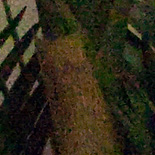
Since this is a nature photography website, I wanted to use a nature-related test scene, not a studio shot. Unfortunately the weather has been overcast for days and not really suitable for an ISO test. So I settled for an indoors shot of a fake plant in an office. Sorry! đŸ™‚


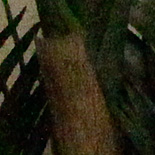
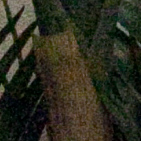
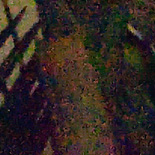
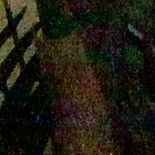
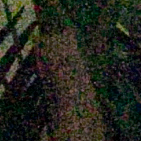
First off, let’s look at some full resolution samples: RAW with Lightroom defaults, RAW with hand-adjusted Lightroom noise reduction settings, full-size JPEG with Standard NR. I tested all four NR settings for the JPEG and felt that Standard was the best compromise between noise and resolution. I let Lightroom apply a little screen sharpening when exporting the 100% crops, otherwise sharpening was at it’s default settings.


1600
RAW RAW w/NR JPEG w/Standard NR
3200
RAW RAW w/NR JPEG w/Standard NR
6400
RAW RAW w/NR JPEG w/Standard NR
12800
RAW RAW w/NR JPEG w/Standard NR
25600
RAW RAW w/NR JPEG w/Standard NR

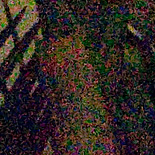
After ISO 6400 the chroma noise is pretty tough to get rid of. The in-camera NR for JPEGs is quite effective. If you own a program like Noise Ninja, you can probably get even better results.


Now lets look at some lower resolution images and see if we can make any gains in reducing visible noise. I’ve taken the same three sets of images and resized them to D3/D700 equivalent resolution, and applied a little screen sharpening. I’ve also thrown in a set of 9.9 MP sRAW1 images with default Lightroom NR for comparison.


1600
RAW RAW w/NR JPEG w/Standard NR sRAW 1
3200
RAW RAW w/NR JPEG w/Standard NR sRAW 1
6400
RAW RAW w/NR JPEG w/Standard NR sRAW 1
12800
RAW RAW w/NR JPEG w/Standard NR sRAW 1
25600
RAW RAW w/NR JPEG w/Standard NR sRAW 1

I think 6400 looks pretty good at this smaller size, regardless of processing method…better than it does at the original resolution. I wish I had a D700 to compare it to directly. The in camera processing wins out at 12800, and 25600 still looks pretty dire.


So what did we learn? It seems that the in-camera noise reduction is more sophisticated than anything I know how to do in Lightroom, although I only like the results at 6400 and above. If you look at the ISO 1600 and 3200 images, the JPEGs have excessive NR that sacrifices too much resolution. I’m not going to stop shooting RAW, so it might be time to look into buying Noise Ninja…I’ll post a review if I do. On the whole, I think I’ll be quite willing to shoot at ISO 3200 when necessary. It’s not quite as good as 1600, but most of the resolution is still there. 6400 is pretty viable too, especially for non-enormous prints. Even 12800 probably has its place. But 25600…the chroma noise is so bad, I wonder if you’d be better off pushing 12800 by a stop? Guess that’ll have to wait for another test.


I’d also like to make some prints and see what the different noise levels really look like on paper. Comparing prints of the same size is really the best way to look at noise, but I can’t show you prints over the internet. In the meantime, take a look at DxOMark’s comparison of the 5D Mark II and D700. Go to the “SNR 18%” section, then click the “Print” tab. The cameras are really close in this test.

DxOMark analysis of 5D Mark II

DxOMark has posted their analysis of the 5D Mark II. If you look at the comparison to the 1Ds Mark III, the 5D2 is nearly identical at ISO 100, with very small numerical advantages in some areas going to the 1Ds3. As the ISO increases, the 5D2 pulls ahead a bit in nearly every test. Go see the results for yourself. Lab testing is only one part of the story when reviewing a camera, but I think these results clearly indicate that the 5D2 can go toe-to-toe with the 1Ds3 in terms of raw image quality…that is, once those pesky black spots go away.

Black dots in 5D Mark II images


Update: As of the new 1.0.7 firmware, it appears that the problem is fixed.


Recently the web has been buzzing with news of strange artifacts in photos from the new Canon 5D Mark II. In some cases small black dots appear next to bright highlights. Yesterday someone thought they had found a combination of settings that fixed the problem, but it appears that report was incorrect. At first I couldn’t reproduce the problem with my production camera, but unfortunately I’ve now found a real world image that exhibits the problem. I’ve also been able to replicate it under controlled conditions.


In the 100% crop below you can see where I’ve circled black dots that appear next to some of the highlights. This image was shot at ISO 200 and Highlight Tone Priority, High ISO Noise Reduction and Auto Lighting Optimizer were all disabled. This is a RAW image that was processsed with Canon’s Digital Photo Professional software. I can also see the artifacts when I convert the image to DNG and open it in Lightroom 2.1.


Since the dots appear next to small, bright highlights with high contrast edges, I realized that I could reproduce them by poking holes in a piece of black construction paper and taping it in front of a lamp. I made sure there was enough light falling on the paper so that the dots would be visible against the background. Below you can see 100% crops for ISO 100-25600. All images were shot RAW and converted with DPP. For this test Peripheral Illumination Correction, Highlight Tone Priority, High ISO Noise Reduction and Auto Lighting Optimizer were all switched off.


ISO 100 ISO 200 ISO 400
ISO 800 ISO 1600 ISO 3200
ISO 6400 ISO 12800 ISO 25600


So that’s the bad news. It seems likely that this problem is present on all the new 5D Mark II’s. It’s interesting to note that in the vertical images the spots are on the top of the highlight and in the horizontal images they are on the right side. This really means that the dots are always showing up in the same relative position with respect to the sensor. If we’re really lucky, the problem is something that can be fixed in firmware. A hardware problem with the sensor would be seriously bad news for Canon and for all us early adopters. I’m pretty disappointed that Canon screwed this up. While we wait for a fix, I’m hoping that for my nature photography it will be relatively rare that these dots show up. I’ll be keeping an eye out for them and will post more real world examples as they come.


Update: This is interesting…Northlight Images has noticed that one of the still images shot during the making of Reverie exhibits the black dot problem. Look at the last strand of lights on the bridge, towards the right of the image.

But wait, there’s moirĂ©

After seeing the early samples, everyone’s been really excited about the video quality of the 5D Mark II. But does it really live up to the hype? Certainly it can produce beautiful shallow DOF images, but there are some issues. It appears that the video is susceptible to moirĂ©, leading to false color artifacts in some cases. Jim Jannard posted a test pattern showing this problem on the Red user forums, and this post on Crunchgear provides a possible technical explanation for the source of the problem. It would be one thing if this problem only showed up in the lab, but unfortunately I’m seeing it in some of my real world footage.


I’ve seen it manifest as out of place red and blue pixels in areas of patterned detail, such as in the rough weave of a polo shirt or in fine hair. More interestingly for my subject matter, I’ve also seen it in moving water in some cases. Here are some example frame grabs and corresponding 100% crops. There’s some JPEG artifacts in these web versions, so don’t pay attention to anything except the moirĂ©.


Canon 5D Mark II – Image Quality

So far I’ve mostly been writing about the 5D Mark II’s video mode. This evening I was able to get out to the coast and make some still images like the one below. I’m pleased to say that the image quality seems to be at least as good as the 1Ds Mark III.


Take a look at this 100% crop. I shot RAW and applied my normal amount of unsharp mask. Tons of detail and the shadows look good too. ISO 100, 1.6 seconds at f/11. A split ND filter was used to balance the sky with the foreground.

Using a variable ND filter with the 5D Mark II’s video mode

In this article I’ll tell you why you might use a variable ND filter for video, what it is, and how to use it to trick the exposure metering of the Canon 5D Mark II’s video mode. Read on to find out more.


This image is a frame capture from a video clip that I shot this morning with the 5D Mark II. The lighting is direct early morning sunlight, just after sunrise, so it was pretty bright. The camera originally wanted to use an aperture of f/11, but I forced it to open up to f/2.8 so that I could get the shallow depth of field you see here. But wait, there’s no manual controls in video mode. So how’d I do that? With a variable neutral density (ND) filter.


So what is a variable ND filter? It’s a screw-on filter that provides adjustable light reduction. It has a rotating front element (like a circular polarizer), which allows you to control the light transmission of the filter. They’re commonly used by landscape photographers to get slower shutter speeds when photographing moving water. The one I have is the Singh-Ray Vari-ND. It provides about 2 to 8 stops of light control depending on the setting.


Okay, so why did I need to use one for video? There’s two reasons. The first one is light control. If I were shooting stills, I could go all the way up to the camera’s maximum shutter speed of 1/8000 second and I’d have no trouble shooting at f/2.8 without filters. But in video mode the shutter speed is limited, possibly as low as 1/125 according to some reports. So the ND filter gives me back some of the light control that I lost.


Here’s the really interesting part. The variable ND filter also gives me the ability to trick the camera’s metering system and regain some semblance of manual control over the video mode. If a scene is too bright, the camera decides to stop down the aperture. By adding the ND filter, you can use it to reduce the light intensity until the camera decides to open the aperture again. However, something weird happens here. The 5D Mark II first pushes up the ISO before opening the aperture, and then the ISO stays quite high with the new aperture. What’s really cool about having a variable ND filter is that you can fix this by backing off on the filter and letting a little more light in again. It seems that the camera gets “stuck” at the new aperture and will reduce the ISO before closing down the aperture again. Then you can lock the exposure with * and you’re good to go.


Here’s an example sequence of meter readings that illustrates my point. Let’s assume that the shutter speed is staying constant throughout the sequence (in reality it may fluctuate some):


  • Initial metering
  • f/11 and ISO 800
  • Add the Vari-ND at it’s lightest setting
  • f/5.6 and ISO 800
  • Start turning the filter to make things darker
  • f/5.6 and ISO 1600
  • f/5.6 and ISO 3200
  • f/2.8 and ISO 800 (the camera seemed to skip over f/4 in my test)
  • Now start turning the filter the other way
  • f/2.8 and ISO 400
  • f/2.8 and ISO 200
  • Lock the exposure and start filming


If you’re shooting with a zoom lens, you might even be able to combine this with my trick for controlling shutter speed.